The INI Catalog is where all the INI objects for the current project are stored.
This catalog enables you to have multiple INI objects for the user to edit. You can mix and match objects wherever you want, so long as you assign that object to that particular INI.
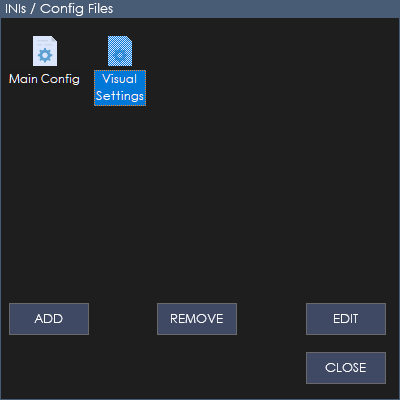
You can access the catalog via the main menu (View > Config Files). Once you are in the catalog screen, you can add, remove or edit the INIs associated with your project.
Unless you specify an INI file, objects inside your dialog will not apply any settings to any file.
A word about INI files here. The INI files you stipulate here are only ‘links’ to the INI files to be edited. If the INI file does not exist in the location specified and the user modifies an object, the runtime will create the INI file where you have specified.
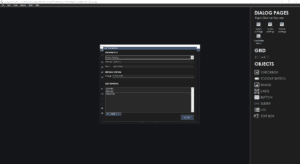
Add INI File
To add an INI file, simply click the ‘ADD’ button.
You will be presented with a dialog
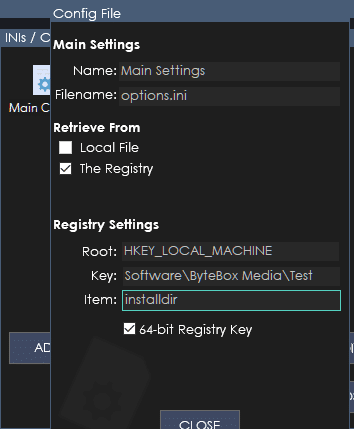
Name: This is the name of the INI file (not the filename). This is just an internal reference for you.
Filename: This is the relative filename of the INI file.
If you are using local file, just stipulate the filename local to where your config.exe will be. So if it’s in the same folder, just use the filename like ‘options.ini’. If it’s in a sub-folder, you can use ‘data\options.ini’. If it’s in a folder above the config.exe you can use symlinks such as ‘.\options.ini’.
If you are using the registry to locate the INI file, you will need these three additional settings:
Root: Specify the registry root for the key to be used
Key: Specify the full registry key
Item: The string value inside the registry key to read the directory path from
64-bit Registry Key: Enable this if there’s potential for the user to be using your app on a 64-bit machine (or the registry key could be 64-bit). It’s probably wise to always use this option.
Remove INI File
To delete or remove an INI file, click the Remove button when you have selected the INI file to be used. Please note, this action cannot be undone, so be sure you want to delete it before you do. I’s also wise to backup your project file (.cfc file) before doing this.
Edit INI File
If you need to edit an INI file from the catalog, click the edit button.